Friday, October 26, 2012

Squash and Bacon Pizza


So, in case I haven’t made it clear yet, I love pizza.  To be honest, in the past two weeks, I think I have had pizza four times.  One of them, that I had at Pizzeria Paradiso in Alexandria, Virginia, is what inspired this pizza.
It incorporates two of my favorite things: pizza and fall flavors.  And even though the temperature is supposed to hit 80 degrees this week (a big ol’ WTF to that!), the CSA’s and grocery stores are full of pumpkins and squash, and this is a different way to use them.
This pizza is also weight watchers friendly, unlike some of the pizzas I have posted about in the past (see gyro pizza and Indian inspired pizza).  One of my big things with pizza is that I will pretty much eat however much is put in front of my, so I had to come up with a recipe for dough that wouldn't break the bank, points-wise. In order to make it work, I make this crust very, very thin.  The dough is almost translucent when it is stretched out.  I prefer a thin crust pizza anyway, so this doesn't bother me at all, but if you prefer a thicker crust you can use the same amount of dough and just stretch it out less. Scott, my official pizza dough stretch, can make this dough cover our entire 14 inch cast-iron pizza pan.

Homemade Pizza Dough
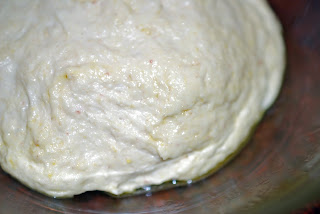
Rising pizza dough
Serves 2, 7 Weight Watchers Points Plus

1 cup white flour
½ tablespoon olive oil
½ cup water
1 teaspoon salt

1 teaspoon bread machine yeast (I use this instead of a packet because I go through a decent  amount of yeast, and this will be fine in the fridge for a while)

In the bowl of a stand mixer fitted with a dough hook, or a food processor fitted with a dough blade, put the flour, salt and yeast.  Stir together.  Pour in the olive oil, and then slowly drizzle in the water with the machine on low.  The dough will start to come together, and when it pulls away from the sides and forms a ball you know it will be good.  If it is very sticky you may have to add more flour, but this could increase the points depending on how much you need. 

At this point, let the mixer or processor run for about 4-5 minutes to knead the dough.  Put the dough in a bowl coated with olive oil spray, turning the ball of dough to coat it, and cover with plastic wrap.  Let rise in a warm place for about an hour.

Pre-heat the oven to 450 degrees.  I like to par-bake my pizza dough because I find it get crunchier this way.  Stretch your dough to the desired size.  If you stretch this size dough to cover a 14 inch pizza pan, bake it for 7-8 minutes until the top has a nice crustiness.  If you make it smaller and thicker, you will have to bake it for longer.  Once your pizza crust is par-baked, you are ready to top it.  Then you bake for another 7-8 minutes until done. 

Beautiful roasted squash
Squash and Bacon Pizza
Serves 2, 14 points per serving

One serving of pizza dough
1 small acorn squash
1 small onion
¼ cup water
Salt and pepper to taste
2 slices of bacon
3 ounces of cheese, shredded
Olive oil spray

Once your pizza dough is rising, you can get your other ingredients together.  Preheat oven to 450 degrees.  Cut the squash in half, scoop out the seeds and put on a baking sheet. Peel and quarter the onion and put on the baking sheet.  Spray both with olive oil spray. Roast until the squash is soft about 45 minutes.
Onion with a hint of carmelization

Meanwhile, dice the bacon and sauté until crispy, then drain on paper towels.  Reserve for later.  Once the squash and onion are done, let rest until cool enough to handle, then scoop out the flesh into a measuring cup or food processer along with the onions, salt and pepper, and water.   You can also throw in some red pepper flakes for heat if that is your thing. Use a immersion blender or food processor to puree until smooth. 
Bacon getting crispy
Shred your cheese.  I think this works best with a nutty cheese, such as a gruyere or aged cheddar.  It brings out the flavor of squash.

Once your pizza dough is ready, par-bake as described in the first recipe.  Once half cooked, pull from the oven.  Spread the squash puree on the dough, then top with the cheese and bacon.  Cook for another 7-8 minutes until dough is crispy and cheese is melted.

The finished product!
Let cool for a few minutes, slice and enjoy!

I hope these pizza recipes have inspired you to branch out and try something completely different!
Wednesday, October 10, 2012

French Onion and Mushroom Soup

Food memories are extremely powerful things.  So many events in our lives revolve around food- wedding cake, your first meal in a fancy restaurant, comfort food from mom after a long day at school.  One of my favorite food memories revolves around French onion soup.

When I was growing up, my family was fortunate enough, thanks in part to a bygone era when companies had good perks, to belong to a country club.  The point was so my dad could take clients there, but I have no memories of that ever actually happening.  I do have many wonderful memories of going to dinner there once a month, getting all dressed up, and being treated like family by the wonderful wait staff who watched us grow up.

At these dinners, my mom would almost always get the French onion soup.  She loves it, with the melt-y cheese bubbling on top and the deep caramelized onion flavor.  My goal when she ordered onion soup was to pick all of the little bits of cheese off of the side of the bowl that would get crunchy and toasted.  My mom had to watch me like to a hawk to make sure that I didn't get all of it.

This isn't my only memory of French onion soup.  When I was young, I didn't actually like the onion part of the soup.  The broth, yes.  The cheese, yes.  I could take or leave the crouton floating at the top.  And my mom, with the patience of a saint, would strain out the onions for me when she would make it at home. Sometimes I wonder how she put up with me!

This will turn into....
Eventually, as my palate became more refined, I started to actually endure the caramelized onions, and now I love them. I could literally eat them out a bowl with a fork and be perfectly happy.  One things I don't love about caramelizing onions is standing at the stove for 45 minutes to an hour, stirring and stirring.  I love recipes that take all day and make my home smell delicious, so I did some research and found out a great and easy way to make the onions without standing there stirring.  Now, you can't leave the house while this recipe is working, but you can watch some TV or do other chores.

this!

Oven Caramelized Onions
12 points for the whole batch

3 pounds of onions (I used a mix of white and sweet), sliced thinly
4 tablespoons of butter
cooking spray

Heat your oven to 400 degrees.  Spray the inside of an oven proof dish with a lid with cooking spray (I like to use a dutch oven).  Put all the onions in the dish, then put the butter, cut into chunks, on top. Cover and bake for 2 to 3 hours, stirring every half an hour.  If there is a lot of liquid in the dish after the first hour, crack the lid.  Your onions are ready when they are a deep, golden brown.  Set them aside in a bowl, but do not clean our the dutch oven yet!

When I decided I wanted to make French onion soup on my day off, I also decided I wanted to lighten it up.    Beef stock or broth from the store isn't very good, and I didn't feel like making my own.  Plus, the way I decided to do it makes it vegetarian.  I went ahead and made my own mushroom stock.  It was very easy.

The ingredients for the mushroom stock all laid out
Mushroom Stock
14 points for the whole batch

4 tablespoons of olive oil
4 portabello mushroom caps, chopped into large chunks
8 ounces baby bella mushrooms
6 ounces dried mushrooms- any variety will work
1 onion, peeled and halved
1 carrot, chopped into several pieces
Parmesan rind (optional, available at Whole Foods)
Several sprigs of thyme and rosemary
                                                                                      16 cups of water

Clean the mushrooms of any dirt and prepare all the other ingredients. Heat the olive oil in a large stock pot.  Once sizzling, put in the portabello caps and the baby bellas.  Saute until brown, about 5-7 minutes.  Once brown, throw everything else in and cover with the water.  Bring to boil, then turn down to a simmer.  Simmer for 1 to 1.5 hours.  There should be a lovely earthy fragrance to the stock at this point.  Let the stock cool for about half an hour.
Once cool, pour the broth into another container through a fine mesh sieve.  You want it to be clear, so you may have to pour it through a cheesecloth or food-safe paper towels to get all the little bits out.  Set aside. 

And now we get to point where you combine everything into a beautiful soup!

French Onion and Mushroom Soup
Makes 6 servings (6 points) or 8 servings (4 points)
*points value is only for soup, not for bread or cheese

2 tablespoons olive oil
8 ounces of mushrooms, sliced - I used 4 ounces of shitake and 4 ounces of Whole Foods Gourmet Blend
2 ounces dried chanterelle mushrooms
Caramelized onions
Mushroom stock

All that brown stuff on the sides of the dutch oven?
FLAVOR! Make sure you scrape that into the soup!!
Put the dried chanterelle mushrooms in a heat safe bowl and pour boiling water on them to re-hydrate   Let stand until ready to use.
Heat the dutch oven over medium heat, and pour in the olive oil. Once the olive oil is hot, saute the fresh mushrooms until golden brown, 5-7 minutes. Stir in the caramelized onions.  Drain the chanterelles, and put in the pot.  Pour in the mushroom stock.
Turn the heat to low and let simmer for at least 1 hour, and as long as 3 depending on your time constraints.

You can serve this plain, or in the traditional way.  Fill an oven-safe French onion soup bowl with soup, and float a slice of baguette on top.  Cover with shredded cheese (I like Gruyere  but you can use many different kinds of cheeses including mozzarella for a milder flavor).  Broil for 1-2 minutes until the cheese is bubbly.  Use caution, as this will be HOT.  Make sure to pick the crusty cheese off the sides of the bowl!

I hope I have inspired you to recreate some of your favorite food memories.  Feel free to tell me about them in the comments section!


Wednesday, October 3, 2012

Double Recipe Review: Steamed Buns & Asian Chicken

If you have ever been to a Chinese restaurant for dim sum, you have probably had a steamed bun.   Light as air, fluffy but with a hint of chew.  I think steamed buns are magical.  They have great texture, but don’t overshadow what you put in them.  Sometimes I like to try to make really complicated things that I have no experience with, so off I went, with the magic of the internet, to figure out how to make them.  After looking at several blogs, I realized that making them was going to be no simple task, and I would need some specialized ingredients.


While doing this search, I stumbled upon a blog with the cheaters way of making steamed buns.  I could not believe my eyes.  Could it really be that easy?  When I told Scott, he was extremely skeptical.  I had seen a recipe on the Skinny Taste blog for an Asian chicken that sounded good, and that I felt I could adapt to make a filling for the steamed buns.

Beautiful, easy steamed buns!

So, what is the secret to the steamed buns, you ask? Biscuit dough.  Like, Pillsbury refrigerated biscuit dough.   I’ll give that a minute to sink in.


It works.  I swear it does!  You should do this right now. 


I found out about this on the website steamykitchen.com, and I just want to find that writer and hug her!  It really was as simple as she said.  You just separate the biscuits, flatten them out a little, fold them in half and steam on parchment paper for about 12 minutes.  I haven’t tried this yet with light biscuits, but if I do I will let you know.  Now, the points for this will vary depending on what biscuit dough you buy, so check the package.  Steamykitchen.com recommends the buttermilk kind, and I bought a different one that worked fine.

For a filling for the steamed buns, I adapted the Skinny Taste Asian Glazed Drumstick recipe.  She used breasts that are cut up, but I used whole skinless thighs that I then shredded.  The sauce is main part of this recipe that is important because you can use it on any cut of chicken that you like.  I found that I had to pull the chicken out of the sauce and boil it with about a half a tablespoon of arrow root to turn it into the thick glaze that I was looking for.   Otherwise, the taste was spot on and I highly recommend this recipe. 


Here is the original recipe:


Asian Glazed Drumsticks
Gina's Weight Watcher Recipes 
Servings: 4 • Serving Size: 2 drumsticks • Old Points: 5 pts • Points+: 5 pts
Calories: 213 • Fat: 4.7 g • Protein: 27.5 g • Carb: 12.7 g • Fiber: 0.4 g  

Asian Glazed Drumsticks (or thighs in this case)
with quickly pickled zucchini on the side
  • 8 medium chicken drumsticks, skin removed
  • olive oil spray (I used my Misto)
  • 1 cup water
  • 1 tbsp Sriracha hot sauce (more or less to taste)
  • 1/2 cup balsamic vinegar
  • 1/2 cup soy sauce
  • 4 tsp agave nectar (or sugar)
  • 3 cloves garlic, crushed
  • 1 tsp ginger, grated
  • 2 tbsp chives or scallions, chopped
  • 1 tsp sesame seeds

In a heavy large saucepan, brown chicken on high for 3-4 minutes with a little spray oil. Add water, balsamic, soy sauce, agave, garlic, ginger, hot sauce and cook on high until liquid comes to a boil. Reduce heat to low and simmer, covered for about 20 minutes. Remove cover and bring heat to high, allowing sauce to reduce down, about 8-10 minutes, until it becomes a thick glaze, turning chicken occasionally. (Keep an eye on glaze, you don't want it to burn when it start becoming thick) Transfer chicken to a platter and pour glaze on top. Top with chives and sesame seeds and serve.

Update: I Still Exist

Paddle Boarding
So I know I haven't written for forever.  I don't really have an excuse.  I just let life get in the way, as usual.  I've been cooking some great things (found a trick for easy steamed buns) and some not so great things (cabbage with mustard.... blech) but I just haven't sat down to write about them.  For now, here are some random updates:

- My big brother got married!  The wedding was beautiful, and was perfectly "them".  I could not be happier for them and wish M & V a lifetime of happiness!

- We spent the week after the wedding on Cape Cod, where we tried a new activity: Paddle boarding.  It was really fun and a great workout, plus you get to see some cool places.  We even got pretty close to a seal at one point.

New Hair Color!
- I decided to change up my hair for fall.  I've been obsessing over ombre` stuff, and like have red hair, so I went with a red ombre` look.  I love it.  The only downside is that red is the hardest color to keep and it has kind of faded to a coppery color, but the coppery color still looks nice.

- Even though I haven't been running as much as I like, this past Sunday I ran in my first 5k (that did not have obstacles).  My husband and I ran together, and we finished in 36 minutes, which is better than I expected!

Waffles!!
- We bought a waffle iron, and I figured out a great  points-friendly waffle recipe!  Also, waffles are amazing and making them at home is great!

- Fall is my favorite season, and is full of great events.  This weekend I am going to an Oktoberfest thing at a bar in D.C..  Next weekend is my 5 year wedding anniversary.  Scott, my husband, is working hard on present and I have no idea what it is and it is driving me crazy!  We are going to the spa in the morning, then a wedding in the evening.  We are taking a trip in November since we can't go away the actual weekend of our anniversary.

- I promise to get my butt in gear and write some recipes!